


 Password Manager
 Identity Theft Protection

 Team / Business
 Enterprise
 Government
 MSP
MSP


Enable MFA in Azure by applying Microsoft Entra multifactor authentication through Conditional Access — the recommended path for any tenant with Entra ID P1 or P2 licensing. If your tenant runs on free Entra ID, Security Defaults is your fallback. The minimum you need to get started: the Conditional Access Administrator role (or Global Administrator) and at least one Entra ID P1 license. Before you touch a single policy, create a pilot test group and a break-glass account. Then build your first policy in report-only mode so you can see exactly who gets affected before enforcement goes live.
Pro Tip: If you’re unsure which path applies to your tenant, open the Microsoft Entra admin center, navigate to Identity > Overview, and check your license tier under “Licenses.” That single check determines whether you configure Conditional Access or Security Defaults.
Key Takeaways
Conditional Access with Entra ID P1 or P2 is the recommended way to enable MFA in Azure; Security Defaults is the correct fallback for free-tier tenants with no custom policy requirements.
| Point | Details |
|---|---|
| Use Conditional Access for production | Entra ID P1/P2 unlocks granular rules, Named Locations, and Authentication Strengths that Security Defaults cannot provide. |
| Create break-glass accounts first | Two cloud-only emergency accounts, excluded from MFA policies by UPN, prevent full tenant lockout if enforcement fails. |
| Start every policy in report-only | Audit sign-in impact for 48–72 hours before switching to On; use the What If tool to validate specific user scenarios. |
| Require phishing-resistant MFA for admins | Apply Phishing-resistant MFA strength (FIDO2 or Windows Hello for Business) to all privileged roles before rolling out to general users. |
| Disable per-user MFA after migrating | Mixing per-user MFA states with Conditional Access causes duplicate prompts; set all migrated accounts to Disabled in per-user MFA. |
What to check before you enable MFA in Azure
Skipping prerequisites is how admins lock themselves out of their own tenant. Work through this list before creating a single policy.
Roles and licenses
- You need the Conditional Access Administrator or Global Administrator role to create CA policies. Check assignments at Identity > Roles & admins > All roles.
- Conditional Access requires Entra ID P1 or P2 per user. Security Defaults is available at no additional cost on free Entra ID tenants.
- If you’re licensing through Microsoft 365 Business Premium or E3/E5, P1 is typically included — verify in the Entra admin center under Billing > Licenses.
Emergency access (break-glass) accounts
Create at least two emergency access accounts before enabling any MFA policy. These accounts must be cloud-only, excluded from all MFA Conditional Access policies, and their credentials stored offline in a physically secured location. Never enable an all-users MFA policy without this exclusion — a failed MFA method or lost device can lock every admin out of the tenant simultaneously.

Pilot group and communication plan
Build a security group (e.g., “MFA-Pilot”) containing a handful of IT staff and willing early adopters. Prepare a short user communication that explains what MFA is, when the prompt will appear, and where to download the Microsoft Authenticator app. Users who receive no warning generate the most help-desk tickets — a two-paragraph email sent 48 hours before rollout cuts that load noticeably.
Pro Tip: Audit existing per-user MFA states before you start. Mixing per-user MFA with Conditional Access policies produces duplicate prompts and inconsistent experiences. Standardize on Conditional Access and disable per-user MFA states for all accounts you move to CA.
Security Defaults vs. Conditional Access: which one should you use?
The choice comes down to licensing and how much control you need.
| Factor | Security Defaults | Conditional Access |
|---|---|---|
| License required | Free (Entra ID) | Entra ID P1 or P2 |
| Custom rules / exceptions | No | Yes |
| Named Locations support | No | Yes |
| Authentication Strengths | No | Yes |
| Per-group targeting | No | Yes |
| Recommended for | Small, simple tenants | Most organizations |
When Security Defaults makes sense: your tenant has fewer than 25 users, no service accounts requiring exclusions, and no need for location-based or device-based conditions. It enforces MFA globally, automatically, with no configuration required.
When Conditional Access is the right call: you need to exclude service accounts, target specific apps, require phishing-resistant methods for admins, or integrate Named Locations. Conditional Access provides granular, scenario-based rules that Security Defaults simply cannot replicate.
One hard constraint: you cannot run Security Defaults and Conditional Access simultaneously. Enabling CA policies automatically disables Security Defaults. If you ever need to return to Security Defaults, you must delete all CA policies first.
- Migrating from per-user MFA? Recreate your enforcement using CA templates before disabling per-user states.
- Migrating from Security Defaults? Export your current state, build equivalent CA policies (Microsoft provides baseline templates for this), then disable Security Defaults.
Pro Tip: Microsoft provides Conditional Access templates that recreate Security Defaults behavior — “Require MFA for all users,” “Require MFA for administrators,” “Block legacy authentication,” and “Require MFA for Azure management.” Start with these templates rather than building from scratch.
How to create a Conditional Access policy that requires MFA
Follow these steps exactly. The navigation assumes the Microsoft Entra admin center (entra.microsoft.com).
- Open Conditional Access. Go to Protection > Conditional Access > Policies > New policy.
- Name the policy. Use a descriptive convention: “MFA-Pilot-YYYY-MM-DD” or “Require MFA – All Users – Prod.” The date helps you track when the policy was created and modified.
- Assign users. Under Assignments > Users, select “Select users and groups,” then choose your pilot security group (e.g., MFA-Pilot). Under Exclude, add your two emergency access accounts. Never skip this exclusion.
- Assign cloud apps. Under Target resources, choose “All cloud apps” for broad coverage, or select specific apps for a narrower pilot. For Azure management specifically, target the “Windows Azure Service Management API.”
- Configure conditions (optional for pilot). You can add Platform, Locations, or Client apps conditions later. For an initial pilot, leave conditions at default to keep the policy simple and predictable.
- Set the grant control. Under Access controls > Grant, select “Grant access” and check “Require multifactor authentication.” For admin accounts, consider “Require authentication strength” and choose Phishing-resistant MFA strength instead.
- Enable report-only mode. Set “Enable policy” to “Report-only.” This lets you audit impact without enforcing anything.
- Save the policy.
Microsoft’s tutorial recommends this exact sequence — pilot group first, report-only mode, validate with sign-in logs, then switch to On.
Pro Tip: After saving in report-only, run the What If tool (Conditional Access > What If) with a pilot user’s account and a target app. It shows exactly which policies apply and what the grant result would be — before a single real sign-in is affected.
- Use the “Require MFA for administrators” CA template to quickly protect privileged roles without building the policy manually.
- Scope your first policy to a small group. Expanding scope is easy; recovering from an accidental tenant-wide lockout is not.
Which apps and endpoints should trigger MFA?
Not every app carries the same risk, but a few targets should be non-negotiable.
- All cloud apps: the broadest and safest default for production. Catches SaaS apps, Microsoft 365, and any OAuth-integrated service.
- Windows Azure Service Management API: anyone accessing the Azure portal, Azure CLI, or Azure PowerShell hits this endpoint. Requiring MFA here protects your entire Azure subscription management plane.
- Sensitive business apps: financial systems, HR platforms, and any app holding regulated data (HIPAA, PCI) should be targeted individually if you need app-specific conditions.
- Microsoft Admin Portals: a separate target resource option in CA that covers the Entra admin center, Exchange admin center, and similar portals.
Excluding service accounts: create a dedicated exclusion group for service accounts and non-interactive identities. Add that group to the Exclude field in every MFA policy. Service accounts that can’t complete MFA prompts will break if you don’t exclude them — and the failure usually surfaces at 2 AM.
Pro Tip: Apply Conditional Access templates from the “Secure foundation” category in the CA template gallery. They’re pre-built, Microsoft-vetted, and cover the most common enforcement scenarios. Starting from a template is faster and less error-prone than building from a blank policy.
How to configure MFA verification methods and authentication strengths
The methods you allow determine both security posture and user friction. Here’s how to think about the stack.
Recommended methods (in order of preference)
- Microsoft Authenticator (push notifications + passwordless phone sign-in): the best balance of security and usability for most users. Push notifications are phishing-resistant when number matching is enabled.
- FIDO2 security keys: hardware-based, fully passwordless and phishing-resistant. Best for privileged admins, shared workstations, or users without smartphones.
- Temporary Access Pass (TAP): a time-limited passcode for onboarding new users or recovering access — not a permanent MFA method.
- SMS and voice call: available as fallbacks, but both are vulnerable to SIM-swapping and SS7 attacks. Disable them for admin accounts.
- Email OTP: appropriate for guest accounts that can’t install Authenticator; not recommended for internal users.
Authentication Strengths in Conditional Access
Microsoft documents three built-in strengths: Multifactor authentication strength (any valid MFA combination), Passwordless MFA strength (Authenticator passwordless or FIDO2), and Phishing-resistant MFA strength (FIDO2 or Windows Hello for Business only). Apply phishing-resistant strength to all administrator accounts and any resource handling sensitive data. General users can start with Multifactor authentication strength and migrate upward over time.
How users register their methods
When MFA is required by policy, users are prompted to register their verification methods at next sign-in. The registration flow walks them through downloading and configuring their chosen method. You can also pre-stage registration by sending users to aka.ms/mfasetup before the policy goes live — this reduces sign-in friction on day one.
- User signs in and hits the MFA prompt.
- “More information required” screen appears.
- User follows the wizard to register Authenticator or another approved method.
- Registration is stored in Entra ID and tied to the user’s authentication methods profile.
Pro Tip: Enable the combined security information registration experience in Entra ID (Identity > User settings > Manage user feature settings). It consolidates MFA and SSPR registration into a single flow, cutting the number of prompts a new user sees.
How to set up emergency access accounts and Named Locations safely
Break-glass accounts
Two emergency access accounts is the minimum. Both should be:
- Cloud-only (not synced from on-premises Active Directory)
- Excluded from every MFA Conditional Access policy by individual account, not by group
- Protected with long, randomly generated passwords stored in a physical safe or offline vault
- Monitored with alerts — any sign-in from these accounts should trigger an immediate security notification
Test them. Sign in with each break-glass account quarterly to confirm the credentials still work and the accounts haven’t been disabled by an automated policy.
Named Locations vs. legacy Trusted IPs
The legacy MFA service settings portal still has a Trusted IPs field, but Microsoft recommends using Conditional Access Named Locations instead. Named Locations support IPv6 ranges and can be used in complex conditions (e.g., skip MFA when signing in from a compliant device on a corporate network). Trusted IPs do not support IPv6 and can’t be combined with modern CA conditions.
Named Locations are the modern replacement for Trusted IPs. Configure them under Conditional Access > Named Locations, define your corporate IP ranges (including IPv6), mark them as trusted, and reference them in your CA policy conditions. Then retire the Trusted IPs list in the legacy portal entirely.
Adjusting exclusions after initial creation
Open the policy, go to Assignments > Users > Exclude, and add or remove groups as needed. Audit exclusions quarterly — exclusion lists grow over time and often contain accounts that no longer need an exception.
How to test MFA safely before full enforcement
Testing before you flip a policy to On is not optional. Here’s the sequence.
- Run in report-only for at least 48–72 hours. Review the Conditional Access insights workbook (Monitoring > Workbooks > Conditional Access Insights) to see which sign-ins would have been affected.
- Use the What If tool. Navigate to Conditional Access > What If, enter a specific user, target app, and conditions. The tool returns which policies apply and the expected grant result.
- Test with a pilot user. Have someone in the MFA-Pilot group sign in to a targeted app. Confirm the MFA prompt appears, the user can complete registration, and the sign-in succeeds.
- Check sign-in logs. Go to Identity > Monitoring & health > Sign-in logs. Filter by the pilot user and look at the Conditional Access tab on each event. Confirm your policy shows “Success” under report-only results.
- Switch the policy to On. Once sign-in logs confirm expected behavior, open the policy and change “Enable policy” from Report-only to On.
Common troubleshooting points
- Legacy authentication clients (SMTP, IMAP, older Office clients): these protocols can’t complete MFA prompts. Block them with a separate CA policy targeting “Other clients” under Client apps conditions.
- Device state mismatches: if your policy includes a device compliance condition and a user’s device isn’t enrolled in Intune, they’ll be blocked. Verify device enrollment before adding compliance conditions.
- Network location misclassification: if a user’s IP isn’t in your Named Locations definition, they may be prompted unexpectedly. Review and update your IP ranges before enforcement.
How to revert changes or move back to Security Defaults
Sometimes a rollout goes sideways. Here’s how to recover cleanly.
- Disable a policy without deleting it. Open the policy, set “Enable policy” to Off, and save. The policy is preserved with all its settings for reference.
- Delete a Conditional Access policy. Open the policy and select Delete. Record the full configuration first — screenshot or export via Microsoft Graph — because deletion is permanent.
- Re-enable Security Defaults. Go to Identity > Overview > Properties > Manage security defaults. Security Defaults can only be re-enabled after all Conditional Access policies are deleted. This is a hard platform constraint.
- Emergency recovery if admins are locked out. Sign in with a break-glass account (which is excluded from MFA policies). If break-glass accounts are also inaccessible, contact Microsoft Support — recovery options are limited without them.
Pro Tip: Before deleting any CA policy, export its JSON via Microsoft Graph API (GET /identity/conditionalAccess/policies/{id}). Store the export in a change management system. Rebuilding a complex policy from memory is painful; rebuilding it from a JSON export takes two minutes.
How to view and verify a user’s MFA state
There are two distinct concepts here: per-user MFA state (a legacy setting) and authentication method registrations (the modern view).
Per-user MFA state
Navigate to Identity > Users > All users, then select “Per-user MFA” from the top menu. Each user shows one of three states:
| State | Meaning |
|---|---|
| Disabled | MFA not required for this user via per-user setting |
| Enabled | Admin has enabled MFA; user hasn’t completed registration yet |
| Enforced | User has completed registration; MFA is required at every sign-in |
For tenants using Conditional Access, all users should show “Disabled” in per-user MFA — enforcement comes from CA policies, not this legacy toggle.
Checking authentication method registrations
- Go to Identity > Users > All users > select a user > Authentication methods.
- Review which methods are registered (Authenticator app, phone number, FIDO2 key, etc.).
- Admins can delete a method from here if a user loses a device and needs to re-register.
Sign-in logs and authentication method reports
Sign-in logs (Identity > Monitoring & health > Sign-in logs) show the authentication method used for each event. The Authentication methods activity report (Identity > Protection > Authentication methods > Activity) gives a tenant-wide view of registration rates — useful for tracking rollout progress across departments.
Evidence-backed best practices for Azure MFA rollout
The guidance below reflects Microsoft’s current recommendations and common patterns from production deployments.
- Prefer Conditional Access over per-user MFA. Per-user MFA is a legacy mechanism. Conditional Access evaluates identity signals in real time and doesn’t leave a persistent MFA state on accounts.
- Require phishing-resistant MFA for all admin roles. Apply the Phishing-resistant MFA strength to any account holding a privileged Entra ID role. FIDO2 keys or Windows Hello for Business are the practical choices.
- Block legacy authentication protocols. Create a CA policy targeting “Other clients” under Client apps and block access. Legacy auth bypasses MFA entirely.
- Use report-only before every new policy. Even experienced admins surface unexpected impacts in report-only. It’s the single most effective way to avoid support escalations.
Migration checklist
- Inventory all per-user MFA states and service accounts.
- Create two break-glass accounts and test them.
- Build CA policies in report-only using Microsoft’s baseline templates.
- Run report-only for 48–72 hours; review sign-in logs.
- Communicate to users; point them to aka.ms/mfasetup for pre-registration.
- Switch policies to On for the pilot group.
- Monitor sign-in logs and authentication method reports for 1–2 weeks.
- Expand scope to all users; disable per-user MFA states on migrated accounts.
Pro Tip: Don’t try to migrate everyone in one week. A phased rollout by department or risk tier — admins first, then finance, then general staff — gives you time to catch edge cases before they affect the whole organization.
What most admins get wrong about Azure MFA rollout
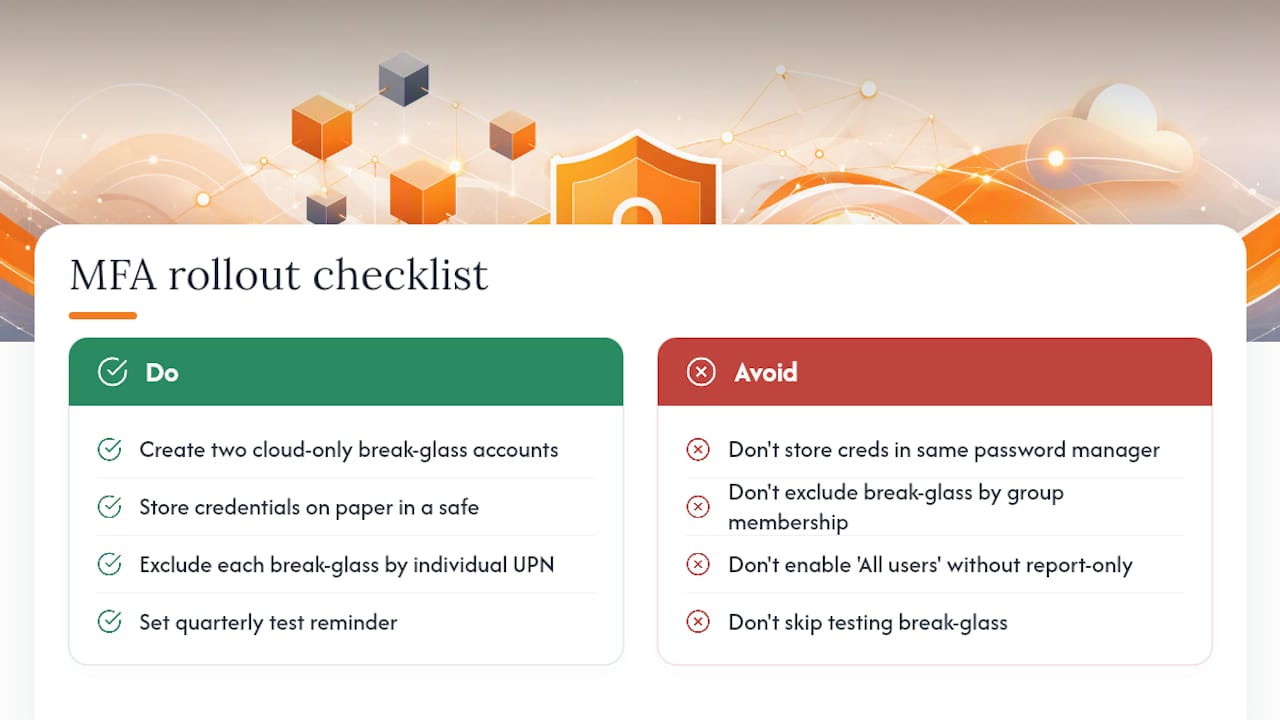
The single biggest operational risk in any MFA rollout isn’t a misconfigured policy. It’s the absence of break-glass accounts. Admins understand this conceptually, but in practice, the accounts either don’t exist, the credentials are stored in the same password manager that requires MFA to open, or they’ve never been tested. When MFA enforcement goes live and something breaks, those are the three failure modes that cause actual tenant lockouts.
The fix is almost embarrassingly simple: two cloud-only accounts, credentials on paper in a safe, excluded from every CA policy by individual UPN (not group membership, because groups can be accidentally modified), and a quarterly calendar reminder to test them. That’s it.
The second most common mistake is enabling a broad “All users” policy without first running report-only. Admins assume they know which accounts will be affected. They’re usually wrong about service accounts, shared mailboxes, and legacy application identities that authenticate interactively. Report-only mode surfaces all of them before anyone gets blocked.
On the communication side: the help-desk spike from an MFA rollout is almost entirely predictable and almost entirely preventable. Users who receive a clear email explaining what’s changing, when it’s changing, and exactly how to register their method generate a fraction of the tickets that uninformed users do. A two-paragraph email and a link to the Microsoft Authenticator download page is not a sophisticated communication plan — but it works.
One shortcut worth taking: use the built-in Conditional Access templates. They’re maintained by Microsoft, they cover the baseline scenarios, and they’re faster than building equivalent policies from scratch. Start with “Require MFA for administrators,” validate it, then layer in “Require MFA for all users” once you’re confident in your exclusions.
Sources
- howto-mfa-userstates
If you’re evaluating broader identity security beyond Azure MFA, Logmeonce offers passwordless MFA and two-factor authentication solutions designed for organizations that need identity protection across platforms, not just within a single cloud tenant.

Logmeonce’s cybersecurity platform covers MFA, single sign-on, password management, and dark web monitoring in one place — worth a look if your organization is consolidating identity tools alongside your Azure MFA rollout.


